Install Guide
In this guide, you will learn how to use FXBlue’s Internet Mirror EA to receive trading signals from a signal provider.
To start the process, please enter your email in the email field on our registration page. Once done, you will shortly receive an invitation email. Please refer to the example below:
After clicking “Accept Invitation,” you will be directed to FXBlue’s Registration page. Complete the registration process, including their verification steps.
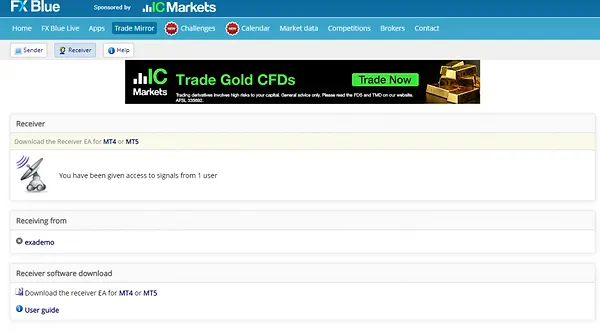
Once you have finished the registration, log back on to FXBlue. You should then be able to see the EA download link, as shown in the screenshot below:
Click on the hyperlink labeled ‘MT4,’ and the download of a zip file will automatically begin.
Once the download is complete, unzip the file. Inside the unzipped folder, you will find the EA installation executable file. Double-click on the EXE file to start the installation process.
Note: Ideally, it is recommended to run your EA on a VPS (Virtual Private Server) as you will need to keep the MT4 terminal open and maintain a constant connection to your broker’s server. Running the EA on a VPS ensures uninterrupted trading even if your local computer is turned off or experiences connectivity issues.
The EA installation process will automatically locate the MetaTrader installation on your machine. If you don’t see the desired directory during the installation, please use the ‘Find MetaTrader’ option to help guide you to the desired terminal.
If you see the desired terminal showing up on the list, click to select it and then click the ‘Install’ button.
Once the installation is complete, you can open the MT4 terminal. In the navigator section of the MT4 terminal, you will find the EA labeled ‘FX Blue – internetMirror Receiver’.
We are almost there! Log in to your MT4 account that you want to use for following the signals. Once logged in, ensure that Auto Trading is enabled. Follow the steps below:
-
Open the MT4 terminal and log in to your account.
-
Look for the Auto Trading button at the top of the terminal.
-
Click on the Auto Trading button to enable it.
-
Verify that the Auto Trading button turns green, indicating that it is now active.
To start using the FX Blue – internetMirror Receiver EA, follow these steps:
-
Locate the ‘FX Blue – internetMirror Receiver’ in the navigator section of the MT4 terminal.
-
Click and drag the ‘FX Blue – internetMirror Receiver’ onto the chart.
-
A settings window for the EA will appear.
Go to Common section and tick the same boxes as below:
Lastly, follow these steps to configure the inputs for the FX Blue – internetMirror Receiver EA:
-
In the settings window of the EA, navigate to the “Inputs” tab.
-
Locate the field labeled “Channel Name” and enter the specific channel name provided in the invitation email (e.g., exademo). Note that the channel name may vary based on the information you received.
-
In the same Inputs tab, find the fields for your FXBlue username and password.
-
By default, the EA uses a 1:1 equity level ratio for risk management. However, if you wish to modify the risk settings, refer to the user guide at the following link: [Insert the correct URL from FX Blue’s website where the user guide is located, specifically addressing risk settings – for example: https://www.fxblue.com/appstore/u21/internet-trade-mirror/user-guide#toc3.4]
Make sure to review and understand the risk management options and adjust them according to your risk tolerance and trading preferences.
Now you are all set to start mirroring trades and adjusting risk settings using the FX Blue – internetMirror Receiver EA. Happy trading!